Lentils and Toast

I think this dish is a perfect meal – it has fiber, protein, veggies, and it is delicious and comforting. It’s a warm combination of lentils, spinach, and caramelized onions, with whole grain toast and a boiled egg to accompany it. I could eat it for any meal of the day, and be happy and satisfied.

It’s from Deborah Madison’s Vegetarian Cooking for Everyone – if you’ve never looked at this cookbook, it’s a great one (whether you are a vegetarian or not). It has sections on different grains and legumes, pantry staples, soups, casseroles, breads, desserts, and the best part is the section on vegetables. Deborah has a few pages for each major vegetable, from artichokes to squash. She tells you the best and simplest ways to prepare each one, and then provides a few different recipes to inspire you.

Green Lentils and Spinach with Hard-Cooked Eggs and Toast, from Deborah Madison’s Vegetarian Cooking for Everyone

1 cup green lentils (also called French lentils, they hold their shape better than brown)
1 tsp salt
1 T olive oil
2 T butter, plus 1 T for finishing
2 medium onions, diced
1 bunch spinach, washed and roughly chopped
1 garlic clove, minced
salt and pepper to taste
4 slices of whole grain bread, toasted
4 soft or hard-cooked eggs

1) Sort and rinse lentils. Place lentils and 1 tsp salt in a saucepan, and add water until covered by a few inches. Bring to a boil, and then turn down to a simmer. Cook until lentils are tender, about 25 minutes. Drain and save broth.

2) Heat olive oil and butter in skillet. Add onions and sauté until soft and beginning to brown, 10-15 minutes. Add garlic, cook about one minute. Add spinach along with some salt, and cook until bright green and starting to wilt, 2-3 minutes.

3) Add lentils to skillet, along with a little bit of the broth (you can save the rest of the broth in the freezer for another use — it has a great earthy flavor). Add another bit of butter, and salt and pepper to taste.

4) Serve with toast and peeled eggs. Yum!

Share

Kid Snacks: Applesauce and Almonds

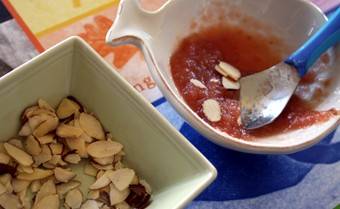
Another simple yet nourishing kid snack – applesauce and sliced almonds. My son especially enjoyed sprinkling the almonds into the sauce himself. So much so, he insisted on also sprinkling almonds into the black bean soup we had for supper. A little fruit, a little fiber, a little protein, and some vitamin E to boot.

If you’re wondering why the applesauce is pink, I went a little crazy last fall and bought a bushel of apples to make applesauce. I used a recipe from America’s Test Kitchen, and cooked the apples with the skins on. The recipe also included a bit of apple cider and a cinnamon stick, then  everything was processed through a food mill. I canned it in a hot water bath so we could enjoy year round, as we typically only eat apples when they are in season.

Share

How does your garden grow?

Come August, if you want a little of this action, it’s time to start planting (or at least planning.)

I could go on and on about the virtues of planting and harvesting your own food – it’s the ultimate way to go local. The food is a few feet and minutes away from your mouth or skillet, guaranteeing you health and freshness. And what an opportunity for your children! Not only does it show kids where food actually comes from, but they are a hundred times more likely to try a new veggie or fruit if they helped take care of it. Last summer, my one year old would pick tomatoes off the vine and eat them like apples – I was overjoyed!

Gardening can be as simple as a few containers on your balcony (just do a search for ‘container varieties’ of your favorite veggies), or more elaborate raised beds. I’m going all out this year, with a goal to grow and store much of the fruits and vegetables we typically eat.

Since we have a large garden space, I’m starting many items from seed in order to cut costs. If you only have a small space, transplants are much easier, but more expensive than starting your own vegetables (and you have more limited choices in varieties.)

To get started:

1) Think about how much time you have, and decide how many plants you would like to grow, and what varieties you would really like to eat.

2) Find a space: count on about 1 plant/sq foot (more for viney things or indeterminate tomatoes). If you can manage a simple raised bed, you will have more control over the soil and fewer weeds and issues. Most vegetables appreciate a lot of sun, and well-drained soil.

3) If you’re new to gardening, locate some good resources. A friendly, knowledgeable neighbor, your county extension office, or a good book (I like Rodale’s Garden Answers for Vegetables, Fruits, and Herbs).

4) Look up your last frost date, and get things planted soon after – with a little watering and weeding, you’ll be thrilled in a few short months!

I just planted carrots, spinach, broccoli, and several different types of lettuce in a cold frame from seed. I’ll sow a few more seeds of each variety every two weeks until it gets too warm. That way I’ll have a steady supply to enjoy.

I started some seeds last week, and plan to start a few more varieties at the end of this week. I’m attempting several different types of tomatoes, peppers (bell and chili), parsley, cilantro, basil, brussel sprouts, cucumbers, and watermelons. They are on a shelf in my basement, underneath a warm fluorescent light.

I’ll also be sowing a number of seeds directly into the garden, as they work better that way: green beans, shelling beans (dried), corn, musk melon, butternut squash, summer squash, and pumpkins.

Here are a few recipes to inspire you to have some fresh veggies and herbs at your fingertips!

America’s Test Kitchen’s fresh salsa: Sorry, you need to sign up for a free trial to view the amounts for this recipe, but it is simple and delicous. The basic technique is available though, so you can certainly wing the amounts.

The Pioneer Woman’s buttermilk ranch dressing and jalepeno appetizers. For the dressing, I usually substitute plain yogurt for half of the mayo, lemon juice for the vinegar, and just use whatever herbs I have on hand – it’s a forgiving recipe, but such a revelation that you can create such deliciousness. For the jalepeno, bacon-wrapped appetizers, I usually add in some sharp cheddar to the cream cheese. These little beauties are so simple, but a HUGE hit at a party (isn’t anything that is wrapped in bacon?)

Alton Brown’s Panzanella (Italian Bread Salad) recipe: feel free to add some cubed cheese and additional veggies, like cucumbers and peppers.

And don’t forget having the ingredients to make gazpacho, insalata caprese, or a fresh tomato pasta sauce just outside your backdoor.

I hope this post may inspire you to plant a few veggies this summer – if you have any questions on gardening techniques or vegetable varieties, please don’t hesitate to email me at tallgrasskitchen@gmail.com. My second secret fantasy (in addition to driving my own sophisticated ice pop truck) is to start a garden coaching business.

Happy Gardening!

Share

Lemon Garlic Pasta

I THINK spring is actually here…we still may have some chilly days ahead of us here in the Upper Midwest, but my rhubarb is peeking up, asparagus is venturing forth, and I’ve worn shorts. (Although the shorts thing isn’t very indicative of the weather, since I’m hugely pregnant and am throwing off heat like a furnace.)

One of my favorite spring pasta dishes is The Pioneer Woman’s Baked Lemon Pasta. Her recipe is delicious as is, but for various reasons I’ve adapted it a bit to save some time and use ingredients I have on hand. It is seriously lemony, and seriously garlicky – a fabulous combination in my opinion. And except for the fresh parsley, I almost always have everything on hand. (Give me a few weeks though, as I will be growing parsley in my garden this year.)

Lemon Garlic Pasta, adapted from the Pioneer Woman’s Baked Lemon Pasta

1 lb pasta
4 T salted butter
2 T olive oil
2 cloves garlic, minced
juice from one lemon
zest from one lemon
2 cups plain yogurt (Greek, or strained regular yogurt)
salt to taste
grated parmesan for serving
chopped fresh flat-leaf parsley for serving

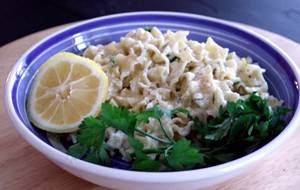
1) Cook 1 lb pasta in salted water until al dente. I used a lovely shaped pasta I hadn’t seen before – mafalda. It was about an inch long and a quarter inch wide with ruffled edges – and it was at the grocery store.

2) Melt butter in large skillet, add olive oil.

3) Add garlic and lemon juice. Stop and inhale the insanely delicious smell coming from your skillet. If you wanted to stop here, brush this concoction on some rustic Italian bread, and then toast it, you would still be in great shape. Or, just dip some bread straight into the pan and enjoy before getting on with the recipe.

4) Remove from heat, add in yogurt, lemon zest and salt. Whisk until smooth.

5) Serve with parmesan cheese and parsley. If you have any juice left in your lemon, give each dish an extra squeeze.

Note on yogurt: Greek yogurt works great, but if you only have the regular stuff, try to think a bit ahead and line a fine-meshed sieve with cheesecloth, a thin/clean kitchen towel, or a few layers of a thick paper towel. Place sieve over a bowl, and place about 2 1/4 cups yogurt in sieve. Let sit in fridge for a few hours to let the whey drain out and thicken up your yogurt. In a pinch, just use it from the tub, but your sauce may be a bit thin and not as smooth. The original recipe uses sour cream, but I like the tanginess of yogurt with the lemons.

Share

Rhubarb Ice Pops

So I’ve been harboring a secret desire to buy a little ice cream truck and sell ice pops – but not just any ice pop. Ice pops for a sophisticated palate. I’m nuts about popsicles, and I’ve been experimenting with all sorts of local, seasonal flavors. Here is one of my favorites, and it is very timely for spring. The color is absolutely stunning, and the flavor is a lovely sweet-tart. Besides the truck, all I need is a flash freezer and a great popsicle mold, and I’ll be in business.

Rhubarb Ice Pop

1/2 cup water
1/2 cup chopped rhubarb
1/3 cup water
1/3 cup sugar

1) Boil 1/2 cup water and rhubarb for about 15 minutes, until rhubarb is soft. Let steep until cool. Strain and discard rhubarb (or use creatively in another dish), reserve stunning pink liquid.

2) Make simple syrup. Bring 1/3 cup water and sugar to a simmer, stir until sugar is dissolved. Let cool.

3) Combine rhubarb liquid and simple syrup. You might want to taste it to see if you like the balance of sweet and tart. It should be slightly sweeter than you would like the finished product to taste, as freezing takes the sugar down a notch.

4)  Pour into ice pop molds and freeze. If you don’t have a fancy mold (you can use anything, a paper cup, an ice cube tray), you will need to let it freeze for about 45-60 minutes, and then place your stick in when it is just getting slushy and can hold the stick upright. Total freezing time depends on the size and shape of your mold. Mine freeze solid in about 4 hours.

Share